Thursday, March 13, 2014

Smart Object! a great feature

Adobe photoshop's smart objects really a smart thing. In this tutorial we use the smart objects for create a nice flower
Open photoshop 800x800 with white color. Pick the pen tool from pen menu and add three anchor points shown a in picture
Pick the convert point tool from pen tool menu and start creating petal
Now click on path tab in layer panel and the click on the icon load path as selection at the bottom pf panel

create a blank layer and fill with any color and just the direction as you want
Convert it into smart object Layer > smart objects > convert to smart object
Double click on smart object (layer) thumbnail to get the editing mode. here change the layer mode ' Multiply ' and fill a gradient. You can use any colors

Now click save File > save...or CRTL +S  and close the smart object editing window
here is the results

Make 9 or 10 copies  of this smart object layer by pressing CTRL + J and adjust the all layers in flower shape

make nested circle with circle marquee tool make you have to select ' Subtract from selection '
create a blank layer and fill it with color who nearly mach the center of flower no exact color.Now got to layer style ' Fx ' at the bottom of layer panel fill the patten ( patten overlay)  change blend  mode normal to color dodge

click Ok and change the layer mode normal to ' Multiply '
Here is Final Result


Working with text in Adobe Photoshop !

Its very easy and handy to working with text in Photoshop. you an trace, re-shape text like other vector graphic software but you can't save your work as vector.
let's start now .... open adobe photoshop and write some thing (single word for practice)
 Now CTRL + CLICK on text layer thumbnail
Delete text layer and create a new blank layer
Click on path in layer panel


Now Click on make path from selection Icon


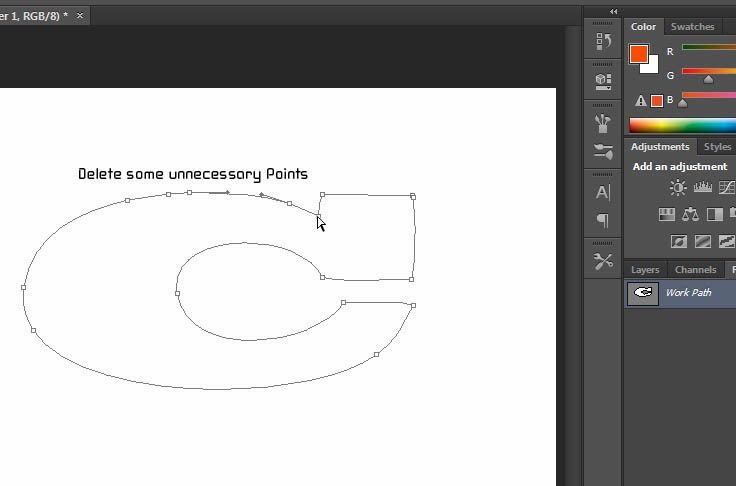
Pick delete anchor point tool from pen tool menu and delete some unnecessary points
Now pick the convert point tool from pen tool menu

Re-shape text as u like

in layer panel click on path tab and the click on the make selection from path icon
Fill the selection with desire color
final


Sunday, March 9, 2014

SMPLAYER !! How to Use...

SMPlayer is a cross-platform free and open source multimedia player front-end for MPlayer. Released under the terms of the GNU General Public License, SMPlayer is free software.


Description

SMPlayer is a free media player for Windows and Linux with built-in codecs that can also play and download Youtube videos.

One of the most interesting features of SMPlayer: it remembers the settings of all files you play. So you start to watch a movie but you have to leave... don't worry, when you open that movie again it will be resumed at the same point you left it, and with the same settings: audio track, subtitles, volume...

SMPlayer is a graphical user interface (GUI) for the award-winning MPlayer, which is capable of playing almost all known video and audio formats. But apart from providing access for the most common and useful options of MPlayer, SMPlayer adds other interesting features like the possibility to play Youtube videos or download subtitles.
  SMPlayer play all types of known media file formats such as .FLV, AVI, .MKV, .MPEG, etc... its also play the blu-ray files.
 You can Download from here.  after downloading and installation run smplayer, At the menu bar you can see a list of menus open, play video, audio etc....
If video has a heavy black strips and you want picture instead of black borders go to video tab and >>> Aspect Ratio ... and set the ratio you like
You can take screenshots with single touch ' S ' ... Press ' S ' during playing the video for snaps.
Also you can set the picture (snap) quality  Goto Video >>> Preview

Control color, brightness etc... with equalizer press CTRL+E or Video >>> Equalizer
SMPlayer has a Audio equalizer too. Go to Audio >>> Equalizer
and set audio preferences..


How to use and optimize greenshot!!

What is Greenshot?

Greenshot is a light-weight screenshot software tool for Windows with the following key features:
1. Quickly create screenshots of a selected region, window or fullscreen; you can even capture complete (scrolling) web pages from Internet Explorer.
2. Easily annotate, highlight or obfuscate parts of the screenshot.
3. Export the screenshot in various ways: save to file, send to printer, copy to clipboard, attach to e-mail, send Office programs or upload to photo sites like Flickr or Picasa, and others.
   GreenShot make possible  to capture the cursor.
          …and a lot more options simplyfying creation of and work with screenshots every day.
Being easy to understand and configurable, Greenshot is an efficient tool for project managers, software developers, technical writers, testers and anyone else creating screenshots.
You can download Greenshot from Here.
After installation just open the configuration  dialogue ( in system tray right click on greenshot icon)
Here you set the key combination for capturing. If you want capture your cursor during screenshot ..... at setting dialogue box click on 'Capture' Tab
option you want to use just check (tik) and click OK.
click on the output tab and select the image format .....
Destination Tab have many interesting features here you can set your preferences how to save or edit the captured image see the image below ..
save directly. It,ll use the preferred output setting who sets under the output tab.
Open image in editor .Greenshot has its own image editor with very nice features you can edit captured or any other images in greenshot editor. if you check this option after taking the screenshot, Greenshot automatically open its image editor or right click in system pan greenshot icon and click on Open image from file
Here is shot of Greenshot editor

There are many nice features, here is one of them 'Obfuscate' its pretty much better and easy here. open editor by right clicking the greenshot icon in system tray, open an image and pic the Obfuscate tool (O) in properties bar set pixel size you want...
drag the mouse where you want  .... see result in image below

Next option in dialogue box under destination tab is 'Copy to clipboard' it,ll gave you ability to edit captured image in any other image editor paint, photoshop etc ....
Next is send to printer .... You can directly  print captured image form printer. according to other option you can send image directly those software who mentioned there.


Download Greenshot

Change hair color easy and fast way with photoshop

This very easy and fastest way tutorial that how to change the hair color in photoshop. Not only
hair you can also change cloths , shoe's color etc.. with this method
Original image:
 Open an image in photoshop
pick the quick selection tool
Make selection around the hairs.
Create a new layer above the original image's layer and fill this with any solid color you want.
and change the layer mode Normal to soft light.
Done!


How to download High resolution Photo from Getty Images !! very easy

1.Find image you want to download from getty images. 2. At the image click on </embed> button A new popup window,ll appear with im...