Showing posts with label how to use. Show all posts

Sunday, March 9, 2014

How to use and optimize greenshot!!

What is Greenshot?

Greenshot is a light-weight screenshot software tool for Windows with the following key features:
1. Quickly create screenshots of a selected region, window or fullscreen; you can even capture complete (scrolling) web pages from Internet Explorer.
2. Easily annotate, highlight or obfuscate parts of the screenshot.
3. Export the screenshot in various ways: save to file, send to printer, copy to clipboard, attach to e-mail, send Office programs or upload to photo sites like Flickr or Picasa, and others.
   GreenShot make possible  to capture the cursor.
          …and a lot more options simplyfying creation of and work with screenshots every day.
Being easy to understand and configurable, Greenshot is an efficient tool for project managers, software developers, technical writers, testers and anyone else creating screenshots.
You can download Greenshot from Here.
After installation just open the configuration  dialogue ( in system tray right click on greenshot icon)
Here you set the key combination for capturing. If you want capture your cursor during screenshot ..... at setting dialogue box click on 'Capture' Tab
option you want to use just check (tik) and click OK.
click on the output tab and select the image format .....
Destination Tab have many interesting features here you can set your preferences how to save or edit the captured image see the image below ..
save directly. It,ll use the preferred output setting who sets under the output tab.
Open image in editor .Greenshot has its own image editor with very nice features you can edit captured or any other images in greenshot editor. if you check this option after taking the screenshot, Greenshot automatically open its image editor or right click in system pan greenshot icon and click on Open image from file
Here is shot of Greenshot editor

There are many nice features, here is one of them 'Obfuscate' its pretty much better and easy here. open editor by right clicking the greenshot icon in system tray, open an image and pic the Obfuscate tool (O) in properties bar set pixel size you want...
drag the mouse where you want  .... see result in image below

Next option in dialogue box under destination tab is 'Copy to clipboard' it,ll gave you ability to edit captured image in any other image editor paint, photoshop etc ....
Next is send to printer .... You can directly  print captured image form printer. according to other option you can send image directly those software who mentioned there.


Download Greenshot

Enhance re-touch photos in photoshop

Today we learn how quick enhance, re-touch photos with very easy and most common steps in
photoshop.
Open an image in adobe photoshop.
Make 5 duplicate copies by pressing the CTRL+J. Now have 6 layers one background and five
other layers. Now rename layers upward from the background
1. Screen
2. Color dodge
3. Overlay
4. Soft light
5. Multiply
set the layer mode by their names
after that duplicate the multiply layer (CTRL+J)
here is Final result


Magic with paint bucket tool 2

In the second part of paint bucket tool  we,ll learn how to fill the background with out adding the layer, after clearing the background, ( how clear background with paint bucket read the part 1
) change the tool behavior clear to behind
select color or patron
 click at the  transparent space of image for filling color or patron


Magic wiht Paint Bucket Tool in Photoshop

Here is some quick tricks how to use paint bucket tool for remove the back ground and fill the
back ground without adding new layer.
open an image in adobe photoshop. unlock background layer. double on background layer
a dialogue  box,ll open click yes
Now pick the paint bucket tool and to the properties bar ( at the top of canvas) andchange
the mode of fill normal to clear .......
click on the area you want to clear
after few clicks, result,ll be


Saturday, March 8, 2014

Create a Razor Blade in Photoshop!


Today We.ll create a razor blade with photoshop. I,ll tried my best to explain every
in easy words and easy way.
1. Open adobe photoshop and create a document 800x800 with black(#000000) Background.

Create a shape with pen tool and fill with # 868686

Duplicate this . Select the shape layer, hold alt key and drag the shape, now you have two
shape set the shape with transforming your image look like this
Now select the round corner shape tool and draw a shape between these two shapes
with same color (#868686)
Now we are going to draw inner portion the  hole and cuts.Tools we are using, marquee circle and rectangle tool, round corner shape tool, draw like this

There four layers for this shape. merge these four layers by CTRL+E and get one layer of shape. duplicate this layer and join the layers like this,
Here is complete example for this shape

Place this shape in the middle of blade body
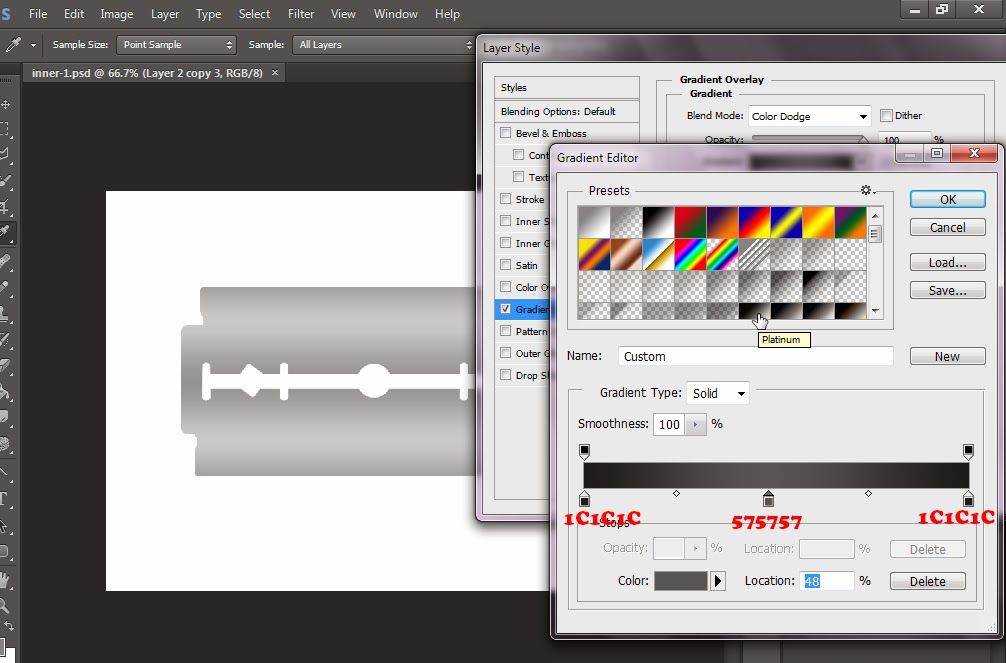
 file the gradient in the body of blade and set color Mode to Color dodge


Now create the sharp edges select the rectangle marquee tool and draw a shape for edges
with white color. pres 'D' and  then go to layer mode and fill gradient make sure the opacity stop
for each color according to image given below

Now duplicate the razor line and set it on the edges of blade

Now add some technical signs, with rectangle marquee tool draw a small shape like this
duplicate this shape three time more now you have four shapes, place these shapes at the
blade like this image
Now pick the custom shape tool and select arrow shape ( you can use another )
Place arrow shape four time

Now select all layers and the merge layers
Now you have only one layer, CTRL+CLICK  at layer thumbnail for selecting the layer and the
pick the circle marquee tool
make sure tool behavior  set at " subtract from selection "  (see the red rectangle in image).
now move your mouse until you get like this,
Press D and X then pick the Gradient tool and the tool behavior shown in image
create a new layer above the one layer you have and fill it. i,ll be gave a little shinny touch.
add some words then pick brush tool and select " Star 42 pixel " brush. add some shin where
you want.


How to download High resolution Photo from Getty Images !! very easy

1.Find image you want to download from getty images. 2. At the image click on </embed> button A new popup window,ll appear with im...